


1.Select Your Product
Choose a style you like, then select the wood type, shape, size, resin color, table edge, surface finish, and table legs. Add them to your cart and proceed to payment.
2.Custom Design
If our existing options do not meet your needs, please click “Design Your Own Table” to create your personalized 3D table, which only takes a few moments.
3.Order Confirmation
After confirming your order, we will match you with wood slabs that meet your specifications, and the CAD drawings will be sent to you within 24-48 hours.
4.Review Drawings
Please carefully review the drawings, ensuring all details are correct and to your satisfaction, then sign for approval.
5.Production Begins
Once we receive your approval, we will start production on the table. Throughout the process, we will keep you updated on the manufacturing progress.
6.Final Confirmation Before Shipping
Before shipping, you will receive some real photos of the table for final confirmation.
7.Tracking Information
After the product is shipped, we will update you with a trackable tracking number.
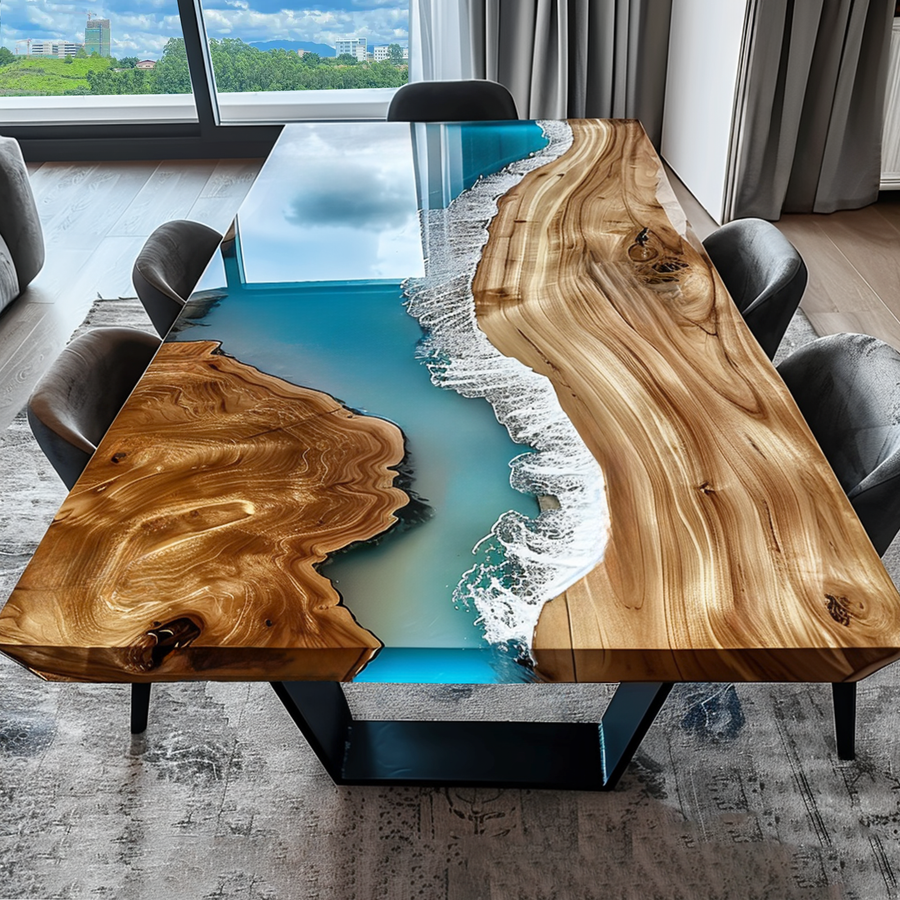
You can personalize your table by choosing your preferred wood type, size, resin color, edge style, and transparency. If you're unsure about any options, please click on our buying guide for assistance. Alternatively, you can select "AS SHOWN" to choose the same attributes as the first reference image for a ready-made option.
Please note that due to the natural characteristics of each wooden slab and the handmade nature of our tables, the final product may not be exactly the same as the image shown. We take pride in the unique qualities of each piece and appreciate your understanding that there may be slight variations in the finished product.
For more information, feel free to contact our customer service team at support@seawavetable.com.

After confirming your order, we will carefully select natural wood that meets your specifications. The design will be tailored to your desired aesthetic while highlighting the unique characteristics of the wood. Each piece of wood has its own distinct features, influenced by factors such as growth environment and light exposure. Even within different sections of the same tree, variations in texture, color, cracks, knots, and holes may occur.
We are committed to preserving every knot, crack, and natural mark in the wood to showcase its authenticity and beauty, while avoiding excessive design elements. Ultimately, the most beautiful designs are shaped by time and nature. Therefore, the final product will not only retain the elements from the reference image (such as waves and broken islands) but also incorporate its own unique features, making each piece special and one-of-a-kind.
SeawaveTable offers complimentary shipping for all orders within the continental United States. Additional shipping fees apply for deliveries to Hawaii, Oregon, Alaska, Puerto Rico, and remote areas.
Expedited Shipping
For inquiries regarding expedited shipping costs, please contact SeawaveTable at support@seawavetable.com. A quotation will be provided within one business day based on the product dimensions and delivery address.
For more details, please refer to our comprehensive Shipping Policy.
The return policy allows for returns within 30 days from the date of purchase for most items. For large or oversized items shipped via freight, returns are accepted only for damage, provided the issue is reported within 5 days of delivery. For further details, please refer to the full return policy.
SeawaveTable provides a one-year warranty from the date of delivery, covering manufacturing defects under normal use. This warranty does not extend to intentional or accidental damage, improper use, or damage caused by external factors.
Included in the warranty:
Complimentary accessories, such as paint or paraffin oil, are provided under warranty, along with guidance on proper application.
Excluded from the warranty:
For any issues with a purchased table, contact support@seawavetable.com within seven days of receipt.
1.Wood Selection:
Wood Type: Choose from Black Walnut, Walnut, Ash, Cedar, Poplar, Olive, and others.
Wood Shape: Select either a natural shape or one modified through design.
Natural Features: Consider knots, burl, grain patterns, natural cracks, end splits, mineral streaks, wormholes, resin pockets, and sap stains.
2.Wood and Color Confirmation:
Confirm both the selected wood and its color during the selection process to ensure optimal matching.
3.Designer Creates CAD Drawing:
A designer will prepare a CAD drawing for your approval.
4.Material Preparation:
Cleaning: Clean the wood thoroughly to remove impurities and enhance texture. The wood may look slightly different after cleaning compared to its original state.
Edge Preparation: Natural wood edges may be slightly scorched during cutting for a better finish, unless specified otherwise.
5.Painting/Resin Application:
Apply resin to lock in bacteria and dust while reducing bubbles. Using resin yields the best results.
6.Shaping and Trimming:
Trim and shape the wood to the desired dimensions.
7.Resin Preparation:
Use a vacuum machine to eliminate air bubbles from the resin, which usually takes 30-60 minutes.
8.Resin Pouring:
Pour the resin in layers, using a torch to remove large bubbles as they rise. Repeat this process for each layer.
Typically, 3-5 layers of resin are needed depending on thickness, with additional layers for wave effects. Each layer requires about 2 days to cure, with the final layer potentially needing longer.
9.Demolding:
Remove the cured piece from the mold.
10.Excess Wood Removal:
Sand away excess wood to achieve a smooth surface.
11.Sanding and Polishing:
Sand the surface and apply scratch-resistant lacquer. This process is repeated 5-6 times, sealing all gaps.
Clean with a thinner to enhance color, and use a brush to apply the first coat of lacquer for better absorption.
12.Inspection and Resin Touch-up:
Inspect the piece thoroughly. Fill any resin gaps and polish raised areas to ensure a smooth surface.
13.Final Lacquering:
Apply the final coat of lacquer in a dust-free room with a spray gun to minimize dust contamination.
14.Final Inspection and Packaging:
Conduct a thorough final inspection. After approval, carefully package the piece with:

